First off you need to know that all your portable electronic devices work because of firmware. This is an operating system embedded in your portable device’s memory. If you buy PSP or MP player from a store, the come preloaded with the factory’s firmware. There are free updates online if you go to the factory’s home site.
So why would anyone want to go through the bother of customizing their own firmware of a PSP? A custom firmware allows for the use of home-brew applications on the PSP, charge the PSP battery by using a USB, and back up games you’ve bought on a memory stick. This lessens mechanical wear on the UMD drive which increases load time and battery life.
 To set up your custom firm wear you will need to have some knowledge how computers work in order not to cause damage.
1. Download the eboot straight the application.
2. Load eboots stored in ZIP files.
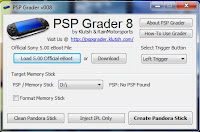
Some PSP Grades have official sites where you can download the firmware for free. The first thing you need to do is find one of theses sites and download the firmware. The next thing you need to do is to extract the EBOOT .PBP file from the PSP-Firmware-390 .RAR and put it somewhere safe and easy to find.
Then choose the PSP grade of your choice and download the application. This is what you’ll use to create the bootable memory stick. Make sure this is the newest version of the application because some of the older application no longer work.
Next you’ll need to open the EBOOT .PBP file that you copied from firmware archives. Don’t worry if the path and file-name changes because it will be copied to it’s own resource directory. Make sure all this is correct make sure “Format Memorystick isn’t checked if your using a general purpose memory stick.
Check that you have a fully charged battery or it’s at least 80% charged. Than insert bootable memory stick. While holding down the L in service mode, this will make the PSP boot from the memory stick. Don’t worry if a black screen with white texts appears, this just means everything is going okay, so far.
Then press X to install 3.90 M33, Press O to install original 3.90, press [] to dump nand, press L+R+start+home to restore nand dump physically. You can press [] to form a backup of the firm ware on the memory stick. After this restart your computer. There may be some blocks when you do this, but it’s not unusual.
Pressing the X and it will write the 3.90M33-3 firmware image . Do not shut of the computer without pressing X because it may cause major problems. You’ll need to check everything to be sure everything went alright. If everything is good to go you are all set. Enjoy the feel of the way your computer now works.


No comments:
Post a Comment