Pages

Subscribe:
Showing posts with label Tutorials. Show all posts

Tuesday, July 19, 2011

PSP Grader - How To Install

have been around for several years. If your not computer savvy, you may not even know what they are much less know how to install them.

First off you need to know that all your portable electronic devices work because of firmware. This is an operating system embedded in your portable device’s memory. If you buy PSP or MP player from a store, the come preloaded with the factory’s firmware. There are free updates online if you go to the factory’s home site.


So why would anyone want to go through the bother of customizing their own firmware of a PSP? A custom firmware allows for the use of home-brew applications on the PSP, charge the PSP battery by using a USB, and back up games you’ve bought on a memory stick. This lessens mechanical wear on the UMD drive which increases load time and battery life.
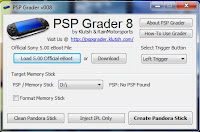
To set up your custom firm wear you will need to have some knowledge how computers work in order not to cause damage.

1. Download the eboot straight the application.
2. Load eboots stored in ZIP files.

Some PSP Grades have official sites where you can download the firmware for free. The first thing you need to do is find one of theses sites and download the firmware. The next thing you need to do is to extract the EBOOT .PBP file from the PSP-Firmware-390 .RAR and put it somewhere safe and easy to find.

Then choose the PSP grade of your choice and download the application. This is what you’ll use to create the bootable memory stick. Make sure this is the newest version of the application because some of the older application no longer work.

Next you’ll need to open the EBOOT .PBP file that you copied from firmware archives. Don’t worry if the path and file-name changes because it will be copied to it’s own resource directory. Make sure all this is correct make sure “Format Memorystick isn’t checked if your using a general purpose memory stick.

Check that you have a fully charged battery or it’s at least 80% charged. Than insert bootable memory stick. While holding down the L in service mode, this will make the PSP boot from the memory stick. Don’t worry if a black screen with white texts appears, this just means everything is going okay, so far.

Then press X to install 3.90 M33, Press O to install original 3.90, press [] to dump nand, press L+R+start+home to restore nand dump physically. You can press [] to form a backup of the firm ware on the memory stick. After this restart your computer. There may be some blocks when you do this, but it’s not unusual.

Pressing the X and it will write the 3.90M33-3 firmware image . Do not shut of the computer without pressing X because it may cause major problems. You’ll need to check everything to be sure everything went alright. If everything is good to go you are all set. Enjoy the feel of the way your computer now works.

Sunday, July 17, 2011

How to Set Your PSP Network Setting

How to Configure Your PSP Network Settings For Web Browsing
 
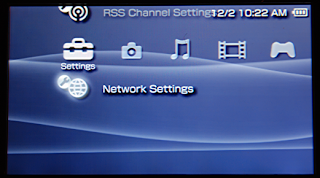
To set up a network connection for your PSP, turn on the PSP and make sure the wireless access switch on the left side of the PSP is on. Once booted to the home screen, press left on the directional pad to navigate to the “Settings” section of the XrossMediaBar. If you are using stock firmware, this should be on the far left with a toolbox icon. Press down until the “Network Settings” entry is highlighted. Press the “X” button to start the Network Settings Wizard. Choose “Infrastructure Mode” from the list of choices. This will allow the PSP to connect to an available wireless router connection. Select “[New Connection]” and press the “X” button on the connection name to set a custom name for the connection.

If the network you want to connect to does not broadcast its SSID, choose “Enter Manually.” In the box provided, enter the SSID of the network. Switching between pages using the directional pad, configure the network’s security and IP address settings. If the network broadcasts its SSID, choose “Scan.” The PSP will then scan for available wireless networks and display a list of the results including signal strength and security. Choose the desired network from the list provided.

At this point, the PSP will display the SSID to confirm your network choice. Using the directional pad, scroll through the options for WLAN Security Settings and Address Settings. The default choices on these menus are typically correct. For WLAN Security Settings, if the appropriate encryption method is not selected, choose the correct method and enter the passkey. For address settings, if the router does not automatically assign an IP address, or you wish to set your own static IP address, choose “Custom” instead of “Easy” and fill in the IP address, DNS settings, proxy settings, and Internet browser start control fields. Use the directional pad to continue to the settings summary.

Confirm the settings are correct and press right again, followed by the “X” button, to save the settings. At this point, choosing “Test Connection” will run diagnostics to confirm the settings allow you to connect to the network and access the Internet. If there are any errors, repeat the process, choosing the network connection you just set up, to confirm that settings were entered correctly. If the test was successful, press the circle button until you are back to the XMB. Launching any programs or services on the PSP that require Internet access will display a prompt requesting which network you would like to use.

Friday, July 15, 2011

Common PSP Wifi Problems and Fix Procedures

Numerous problems can be encountered when attempting to connect a PSP to a wireless network. The first issue occurs when the PSP is completely unable to connect to the network. In this case, the first fix that should be attempted is to turn off power saving by going to Settings, Power Save Settings, and turning off WLAN Power Save. If the problem persists, the next step is to confirm that the right network is being connected to by verifying the SSID and that the correct security key is being used. Following this, every device in the wireless network should be turned off and then turned back on again, including access points, routers, and modems. The problem can also be caused by having too many devices on a wireless network, and so other devices on the network should be disconnected. Finally, the network connection should be verified by accessing the internet through another device, such as a computer.

Another common problem is that the PSP can connect to the network, but cannot access the internet, or that the PSP can access the internet, but not Sony's servers. The most likely problem in these cases is that a router firewall is blocking communication. To solve this, certain ports must be opened in the router's firewall. For PlayStation Network and SCEA game servers, these ports include the TCP Ports 80, 443, 5223, and 10070 - 10080 and the UDP Ports 3478, 3479, 3658, and 10070. To find out how to open ports in a router, the router manufacturer should be contacted.

The last problem that may be encountered is an intermittent or unreliable wireless connection. To fix this, the signal strength must be improved. One way to do this is to simply move the PSP closer to the wireless router. This will improve the connection quality in almost every case. If this is not possible, interference should be eliminated. Physical barriers between the PSP and the router should be removed, and other sources of radiation, such as microwave ovens, florescent lighting, Bluetooth enables devices, 2.4 gigahertz cordless phones, high power sound systems, televisions, computer monitors, or any other source of Radio Frequency (RF) interference should be shut off or removed.

If none of these fixes work, the PSP should be updated to the latest firmware from Sony. If problems continue to persist, Sony technical support should be contacted as the PSP may be defective.

Monday, June 6, 2011

How to Convert Videos to .MP4 for PSP

When converting video files for Sony Playstation Portable (PSP), the best format to use would be an MP4 format. The type of software that is needed to convert the files into MP4 is the “im TOO PSP Video Converter” (Google Search). This sort of software can convert many files into different formats for the PSP.This software is also free for the user to download and use.

The first thing that people would want to do when converting a file to MP4 is they will want to open up the software and add the files that they would want to convert into MP4.They will then want to choose a file that has the capacity of their memory stick. They will then want to set the destination to where they will want the files to end up at.

After they have set the destination they will then want to encode it so that way the files can be added to their memory stick. After the files are transferred to the memory stick, the person will then want to transfer the files to their PSP.

They will first want to connect their PSP to their computer. They will want to use a USB cable and make sure that it is securely in, so it won’t come unplugged. Then wait for the computer to recognize the object, after it is done recognizing it. The person will then want to go into tools and go to the play station portable video manager.

Where the person last saved their files, it should be on the left, but if it is not on the left of their screen they can always browse their computer to locate the folder. Now that they have the files that they want to transfer to their PSP they will then be able to copy the files. The user can now see that the files have been transferred to their play station portable.

Everyone who has a PSP wants to be able to put different audio or video on it, with this software the user will be able to have those files at their finger tips in no time.

Tuesday, May 31, 2011

How to Copy PSP Games Tutorial

Do you want to know how to transfer game files from your computer to your playstation portable (PSP)? I will let you know the way how to do it here in this tutorial:

This will work for people who own a PSP and have PSP  games that have downloaded online and have them on your computer, you may want to copy the games and put them onto your PSP memory stick.

The first thing you will want to do is Connect your PSP to your home computer using a USB cord, this is so you can transfer the data from your computer to your handheld game console. Then you will want to go into your Menu settings and make sure your handheld has a USB connection to your computer.

Once your PSP establishes connection to your computer you can then see that the device is a removable driver on your computer.

You will then want to click the open folder to view files option once your desktop or laptop computer recognizes your PSP handheld. Then double click the game folder that is within the removable drive folder.

Then you want to select the games that you want to put onto your PSP. Then drag them into the Game folder so that they can be copied onto your playstation handheld memory stick. Once you finished dropping the files into your playstation portable the system will recognize the files and copy them onto your memory stick of your handheld.

When getting a PSP system you can do many things with it. You can copy games from your computer onto your PSP and save the games onto your memory stick. This way you can just take the memory stick instead of having all those games inside your bag or pocket.

Not only does this help with space you have, but it also ensures you that you won’t damage any physical copies of a game you have. The reason also why people do this is because they want to transfer games that they have on their computer and want to be able to play them on their handheld instead of buying the physical copy from stores. 

For making backups of your current other games (such as xbox360, PS3, PS2, Nintendo Wii and others) you can check out THIS AWESOME SITE HERE!  I hope this info has been helpful to you guys... Enjoy! :)

Sunday, May 29, 2011

How to Put Themes On Your PSP Tutorial

 If you are someone who owns a PlayStation Portable you will want to probably know how to be able to put themes onto your handheld. The reason why people want different themes on their handhelds is to make it more unique for the player.

The first thing you are going to want to do is open up your web browser and look for any websites that have PSP themes. (Example: Go to Google.com and make search for "PSP Themes".  You will find many sites on the first page of Google) Once you have found a website that has PSP themes that you can download you will then want to look for any themes that you want on your PlayStation portable, there are many themes to choose from.

After you have found the ones that you want be sure to save them somewhere you will not lose them. The best place you can save them to would be your computer desktop that way there would be no chance of you losing the file of the themes.

You will then want to use the cable to connect your PlayStation portable to your computer and connect it to your computer. Then go to your PlayStation portable and make a new folder, name it whatever name you want .Then go into the themes you saved and grab the file of the theme usually they will be formatted in .ptf ,after you have found the file grab it and drop it into the PlayStation portable folder you made for your themes.

You will then open the theme in your PlayStation portable. This is an easy way to add themes to your PlayStation portable.

If you do not want to download the themes on your computer you can always get them from your Playstation portable itself. The way you will want to do it from your handheld is simple and fast.

You will want to go to your handhelds web browser and go to the website you found with the themes you want on your handheld. Once you find one you want you simply click the download theme button and it should save it to your PlayStation portable ready to use.

If you are someone who wants to put many themes onto your PlayStation portable these are steps that will help you get them onto your handheld.