How to Configure Your PSP Network Settings For Web Browsing
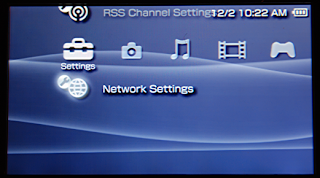
To set up a network connection for your PSP, turn on the PSP and make sure the wireless access switch on the left side of the PSP is on. Once booted to the home screen, press left on the directional pad to navigate to the “Settings” section of the XrossMediaBar. If you are using stock firmware, this should be on the far left with a toolbox icon. Press down until the “Network Settings” entry is highlighted. Press the “X” button to start the Network Settings Wizard. Choose “Infrastructure Mode” from the list of choices. This will allow the PSP to connect to an available wireless router connection. Select “[New Connection]” and press the “X” button on the connection name to set a custom name for the connection.
If the network you want to connect to does not broadcast its SSID, choose “Enter Manually.” In the box provided, enter the SSID of the network. Switching between pages using the directional pad, configure the network’s security and IP address settings. If the network broadcasts its SSID, choose “Scan.” The PSP will then scan for available wireless networks and display a list of the results including signal strength and security. Choose the desired network from the list provided.
 At this point, the PSP will display the SSID to confirm your network choice. Using the directional pad, scroll through the options for WLAN Security Settings and Address Settings. The default choices on these menus are typically correct. For WLAN Security Settings, if the appropriate encryption method is not selected, choose the correct method and enter the passkey. For address settings, if the router does not automatically assign an IP address, or you wish to set your own static IP address, choose “Custom” instead of “Easy” and fill in the IP address, DNS settings, proxy settings, and Internet browser start control fields. Use the directional pad to continue to the settings summary.
Confirm the settings are correct and press right again, followed by the “X” button, to save the settings. At this point, choosing “Test Connection” will run diagnostics to confirm the settings allow you to connect to the network and access the Internet. If there are any errors, repeat the process, choosing the network connection you just set up, to confirm that settings were entered correctly. If the test was successful, press the circle button until you are back to the XMB. Launching any programs or services on the PSP that require Internet access will display a prompt requesting which network you would like to use.
If the network you want to connect to does not broadcast its SSID, choose “Enter Manually.” In the box provided, enter the SSID of the network. Switching between pages using the directional pad, configure the network’s security and IP address settings. If the network broadcasts its SSID, choose “Scan.” The PSP will then scan for available wireless networks and display a list of the results including signal strength and security. Choose the desired network from the list provided.
 At this point, the PSP will display the SSID to confirm your network choice. Using the directional pad, scroll through the options for WLAN Security Settings and Address Settings. The default choices on these menus are typically correct. For WLAN Security Settings, if the appropriate encryption method is not selected, choose the correct method and enter the passkey. For address settings, if the router does not automatically assign an IP address, or you wish to set your own static IP address, choose “Custom” instead of “Easy” and fill in the IP address, DNS settings, proxy settings, and Internet browser start control fields. Use the directional pad to continue to the settings summary.
Confirm the settings are correct and press right again, followed by the “X” button, to save the settings. At this point, choosing “Test Connection” will run diagnostics to confirm the settings allow you to connect to the network and access the Internet. If there are any errors, repeat the process, choosing the network connection you just set up, to confirm that settings were entered correctly. If the test was successful, press the circle button until you are back to the XMB. Launching any programs or services on the PSP that require Internet access will display a prompt requesting which network you would like to use.


No comments:
Post a Comment